Create a headless Raspberry Pi setup
Using a standard operating system installation you won’t be able to connect to your Raspberry Pi remotely upon first boot. However, with a couple easy steps this is possible, thus overcoming the need for any keyboard or mouse to be attached.
Table of contents
Overview
By default, SSH is not enabled on the Raspberry Pi for security reasons and it will not know the credentials of your Wifi network. Because of this, it will be very hard to connect to it remotely without any peripherals before setting these up.
With newer versions of the Raspberry Pi Operating System, it has become possible to add some manual steps after the installation of the Operating System to enable SSH and set the wifi credentials before first boot.
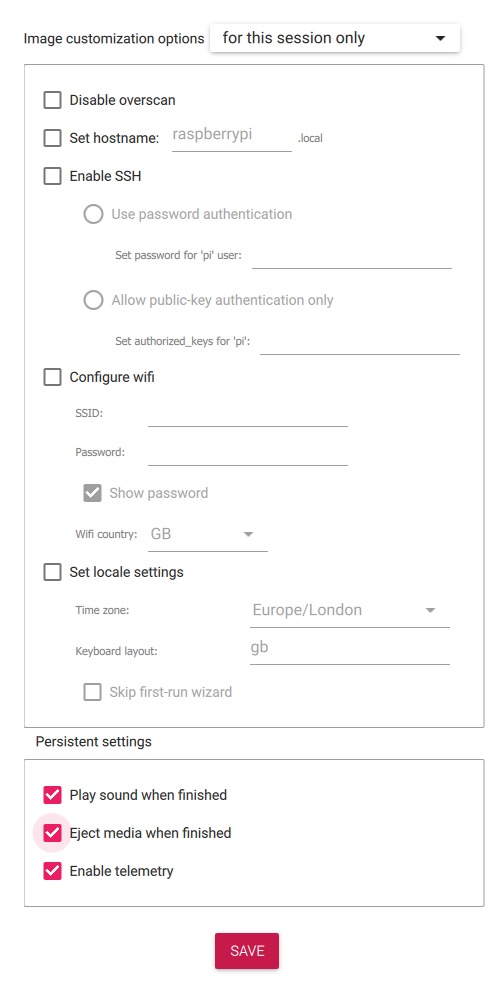
In March 2021 this has become even easer by the release of a new version of the Raspberry Pi Imager software, which adds a hidden menu that makes it possible to set the hostname, enable SSH, configure the Wifi, and set locale settings directly, all when installing the Operating System. his is by far the best and easy solution now, follow the steps on the installation guide. The manual steps below may still be helpful for some situations so are included for completeness.
Manual set-up
With the default installation your Raspberry Pi, SSH is not enabled by default for security reasons. We can however enable it by placing an empty file named ssh (no extension) in the root of the boot disk.
You can either do this using a text editor program or using the terminal by going to the directory of the drive cd PATHOFDRIVE and then typing touch ssh when on a Mac computer or type NUL >> ssh on windows.
Next your Raspberry Pi will need to know the wireless network from which you will connect. To do so, create a file called wpa_supplicant.conf on the Raspberry Pi SD-card, such as with a text editor program, and add the following information:
ctrl_interface=DIR=/var/run/wpa_supplicant GROUP=netdev
Update_config=1
Country=DE

Network={
    ssid="YourWifiNetwork"
    psk="WifiPassword"
}
Make sure to edit the country code and WiFi credentials such that the WiFi works properly. This file will be automatically picked up on first boot and enable the Raspberry Pi to connect to the network.
Now simply eject the micro SD card safely and boot up your Raspberry Pi.
Log in over WiFi
Using either the Raspberry Pi Imager or following the manual steps above, SSH should be enabled on your new device and it should be connected to your WiFi network. The default user is pi, the hostname raspberrypi, and the password raspberry. You can use these credentials to log in to your Raspberry Pi remotely. Open a terminal window on your other computer and type in:
ssh pi@raspberrypi.local
To be able to access your Raspberry Pi on your network by its hostname (rather than its IP-address) on Windows, you will have to install the Bonjour service (unless you have iTunes installed). You can find the installer here.
Now you should have been able to connect to your newly installed Raspberry Pi without the need of any peripherals! Do not forget to change your hostname and password (follow this guide).