Temperature monitoring with the Raspberry Pi
The Raspberry Pi is great for connecting a wide range of sensors. Here I will explain how to connect and read from the waterproof DS18B20 temperature sensor.
Table of contents
- DS18B20 Temperature sensor
- Wiring the sensor
- Load the sensor on your raspberry pi
- Read the temperature in Python
- Change the default pin
DS18B20 Temperature sensor
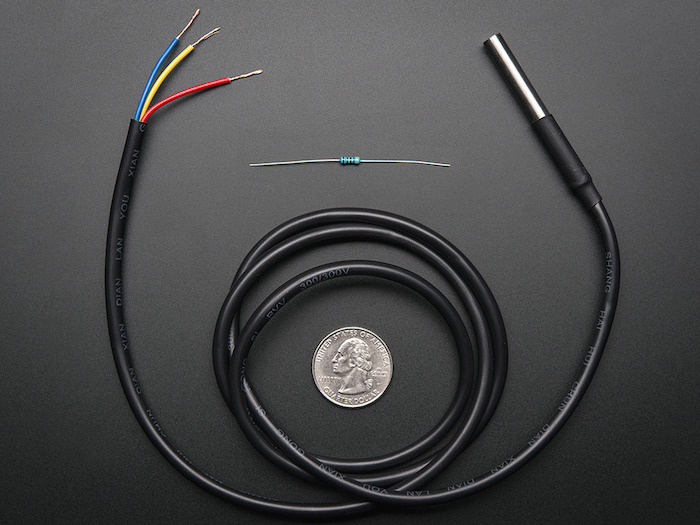
The DS18B20 is a digital temperature sensor that can measure temperatures between -55°C en +125°C with the Raspberry Pi, with the input and output linked on the same wire.
Theoretically up to 128 thermometers can be connected on the same GPIO pin as each will get a unique serial number, but as they will use power from the Raspberry Pi a maximum of 50 sensors may be recommended. Pretty cool!
Wiring the sensor
When you order the DS18B20 it (should) come with a 4.7K resistor cable. The DS18B20 has three wires, a ground wire (black), the power at 3.3V (red) and the data wire (yellow). We need to connect the three wires to the raspberry pi.
An easy way to quickly do this is using a breadboard. However, this is not very handy if you want to properly use it, such as to measure the temperature of your aquaria. My suggested approach is therefore to solder the three wires to DuPont connectors that are easy to connect to the GPIO pins on your raspberry pi. Important thereby is that the resistor should be connected between the power and data wires.
Coming soon: wiring details
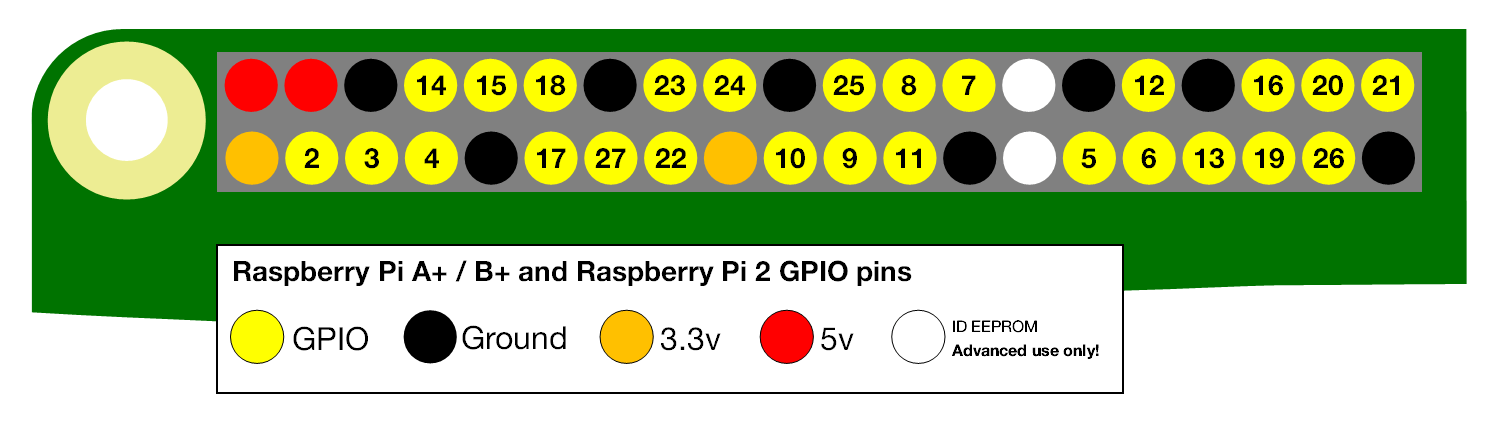
When finished wiring the sensor, connect the black cable to a ground port on your GPIO, the red cable to the 3.3V port, and the yellow wire to GPIO4. The below image may help select the right pins:
Load the sensor on your raspberry pi
Now the sensor is connected turn on your Raspberry Pi. The first thing to do is to enable 1-wire interface, which is required to read out the data of the DS18B20. To do this using the Desktop interface, go to Preferences > Raspberry Pi Configuration > Interfaces > and click Enabled for 1-wire. Alternatively use the raspi-config tool using the terminal. Now reboot your raspberry pi (sudo reboot).
We will now need to identify the serial number of the sensor, which we enable by adding the 1-Wire and thermometer drivers to the Raspberry Pi:
sudo modprobe w1-gpio
sudo modprobe w1-therm
To check if the DB18B20 has connected, go to the directory of the 1-Wire devices and list those available:
cd /sys/bus/w1/devices/
ls
You should now see a folder that starts with 28-xxxxxx. This is the serial number of the sensor. You can read out the raw temperature directly in the terminal by going to the folder cd 28-xxxxxx and typing in cat w1_slave. The temperature is provided after the t= in thousands of a degree.
Read the temperature in Python
To read out the temperature in python, you can use my custom script below:
#!/usr/bin/env python

import os
import glob
import time
import datetime

def read_temp(decimals = 1, sleeptime = 3):

    """Reads the temperature from a 1-wire device"""

    device = glob.glob("/sys/bus/w1/devices/" + "28*")[0] + "/w1_slave"
    while True:
        try:
            timepoint = datetime.datetime.now()
            with open(device, "r") as f:
                lines = f.readlines()
            while lines[0].strip()[-3:] != "YES":
                time.sleep(0.2)
                lines = read_temp_raw()
            timepassed = (datetime.datetime.now() - timepoint).total_seconds()
            equals_pos = lines[1].find("t=")
            if equals_pos != -1:
                temp_string = lines[1][equals_pos+2:]
                temp = round(float(temp_string) / 1000.0, decimals)
                print(time.strftime("%d/%m/%y@%H:%M:%S - ")+str(temp)+" C")
                time.sleep(sleeptime-timepassed)
                timepoint = datetime.datetime.now()
        except KeyboardInterrupt:
            break

if __name__ == "__main__":
    read_temp()
Simply save the script to your raspberry pi (e.g. as tempsensor.py) and run it via python tempsensor.py.
Change the default pin
GPIO pin 4 is the default pin configured on the Pi when enabling 1-Wire functionality. It is however possible to configure one of the other GPIO pins, such as when you need GPIO4 for something else. To do so, type in:
sudo nano /boot/config.txt
At the bottom of the file edit the dtoverlay=w1-gpio line to dtoverlay=w1-gpio,gpiopin=X where X is the required GPIO pin number.