Create a local network
A great way to work with arrays of Raspberry Pi’s, is to create a dedicated local network. Below I guide you through all the steps to set one up.
Table of contents
Planning your network
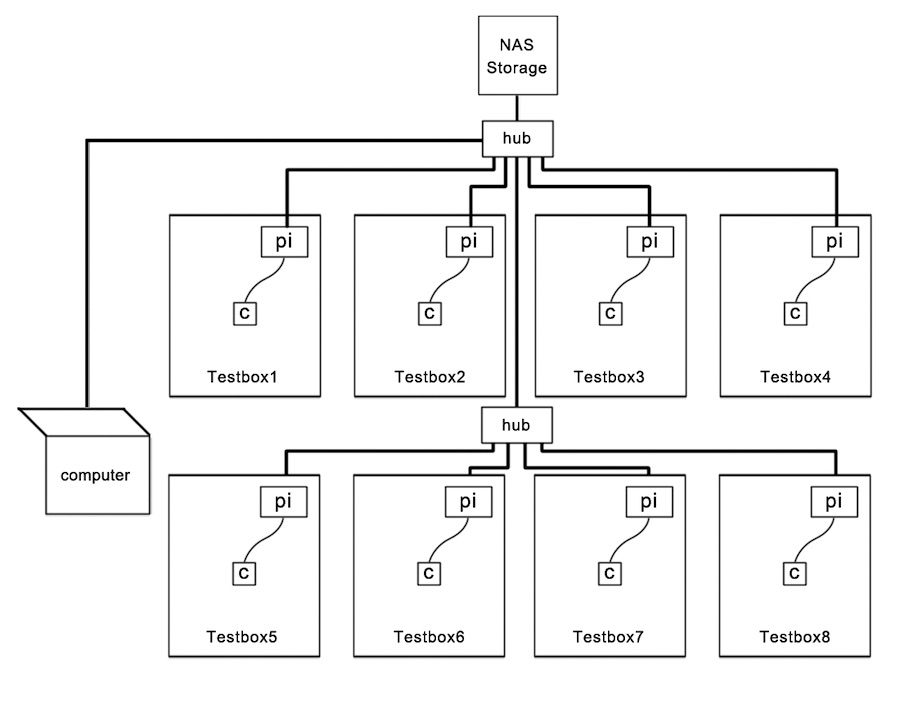
LAN stands for Local Area Network. It is basically like the internet, just a lot smaller, with a group of devices all connected to each other. A LAN can be connected to the internet or be completely separate from it. A LAN is a great way to control an array of Raspberry Pi’s from a central computer, and for example have all Raspberry Pi’s store their data on a large NAS drive on the network.
The minimum you will need for a LAN is a (wireless) router and/or a network switch. A wireless network will be easier to set up physically but a wired (ethernet) network will provide a more stable and high-bandwidth connection.
If you have a lot of devices and plan to use ethernet connections you will need to get a network switch as a router only tends to have a maximum of four ethernet ports.
Determine if you want your devices to have internet access or not. The most simple network only needs a network switch (not a router) but won’t be able to connect to the internet. For security reasons one may also decide to not have all units but only the host computer connected to the internet.
Setting-up the local network
If you are working with a new network switch or router, the first thing to do is set it up. You will need to do this by connecting it to a computer via an ethernet cable.
A router will automatically handle assigning IP-addresses to each device on the network. In contrast, a network switch will allow connected devices to talk to each other but will not automatically assign IP addresses so works better when connected to a router or for setting up a static network.
I tend to prefer to have a static network as it can make it easier to find and connect to your devices as upon restarting the whole system Raspberry Pi’s may change (and swap) their IP-address. The first thing to do is set it up on your host computer.
On a Mac, go to System Preferences > Network > Built-in Ethernet > Advanced where you can set up your network. On a windows PC, go to the Network and Sharing Centre in the control panel and select Set up a new connection or network and follow the steps. To set up a static IP-address on your Raspberry Pi, follow these steps.
If you want to create a wireless network you will have to have a device that broadcasts Wi-Fi, such as a Wi-Fi router. How to set it up depends on the device and brand, but generally you will connect to the router by typing in its ip-address in the browser. The IP-address tends to be printed on the bottom of the router.
Now login with the default username and password, which both tend to be admin by default, and go to the wireless section of your router to set up a new wireless network. Choose a new name (SSID) and password (WPA2) and, finally, make sure your network is enabled.
Setting-up the devices
At this point your router should be working and potential wireless network set up. Also your host computer should be connected to the network. All that is left is to connect all your devices.
How to do this depends if you are planning to use freshly installed Raspberry Pi’s or not, if you will use wired or wireless connections, and if you are planning to use static IP-addresses or not. In general for a solid network I prefer to set all my Raspberry Pi units up afresh, use a hardwired network, and use static IP-addresses.
Using the new Raspberry Pi Imager it is now easier than ever to set up your new installation with SSH and Wifi credentials, and make sure each SD-card will provide a unique hostname to each Raspberry Pi. I therefore suggest to install all the SD-cards of the Raspberry Pi units you are planning to use, for which you can follow this guide.
As we are planning to work with an array of devices it is a great idea to create a series of hostnames that are easy to remember. For example, jolpi020, jolpi100, etc.
When creating the different SD-cards, I suggest to label them with a small sticker that shows the provided host-name, and do the same for the Raspberry Pi, to not confuse things.
Now plug in all the SD-cards in the Raspberry Pi’s and connect them with the router or network switch via ethernet cable (skip when planning just a wireless connection). Using either approach, each Raspberry Pi will automatically be given a unique IP-address and will be directly available on the network.
I tend to prefer to use static IP addresses for each Raspberry Pi such that I can always easily connect and link this to the hostname of the Raspberry Pi based on the subnet. For example, I would set up a local network with the subnet 192.168.2.X and then have jolpi020 with static ip address 192.168.2.020 and jolpi100 with static ip address 192.168.2.100. To learn how to set up a static IP address, follow this guide.
To connect to the devices via SSH you can either use the Raspberry Pi hostname followed by .local (e.g. jolpi.local) or its IP-address. To see if you can find the unit on the network you can type in ping HOSTNAME.local, changing HOSTNAME for the name of your device.
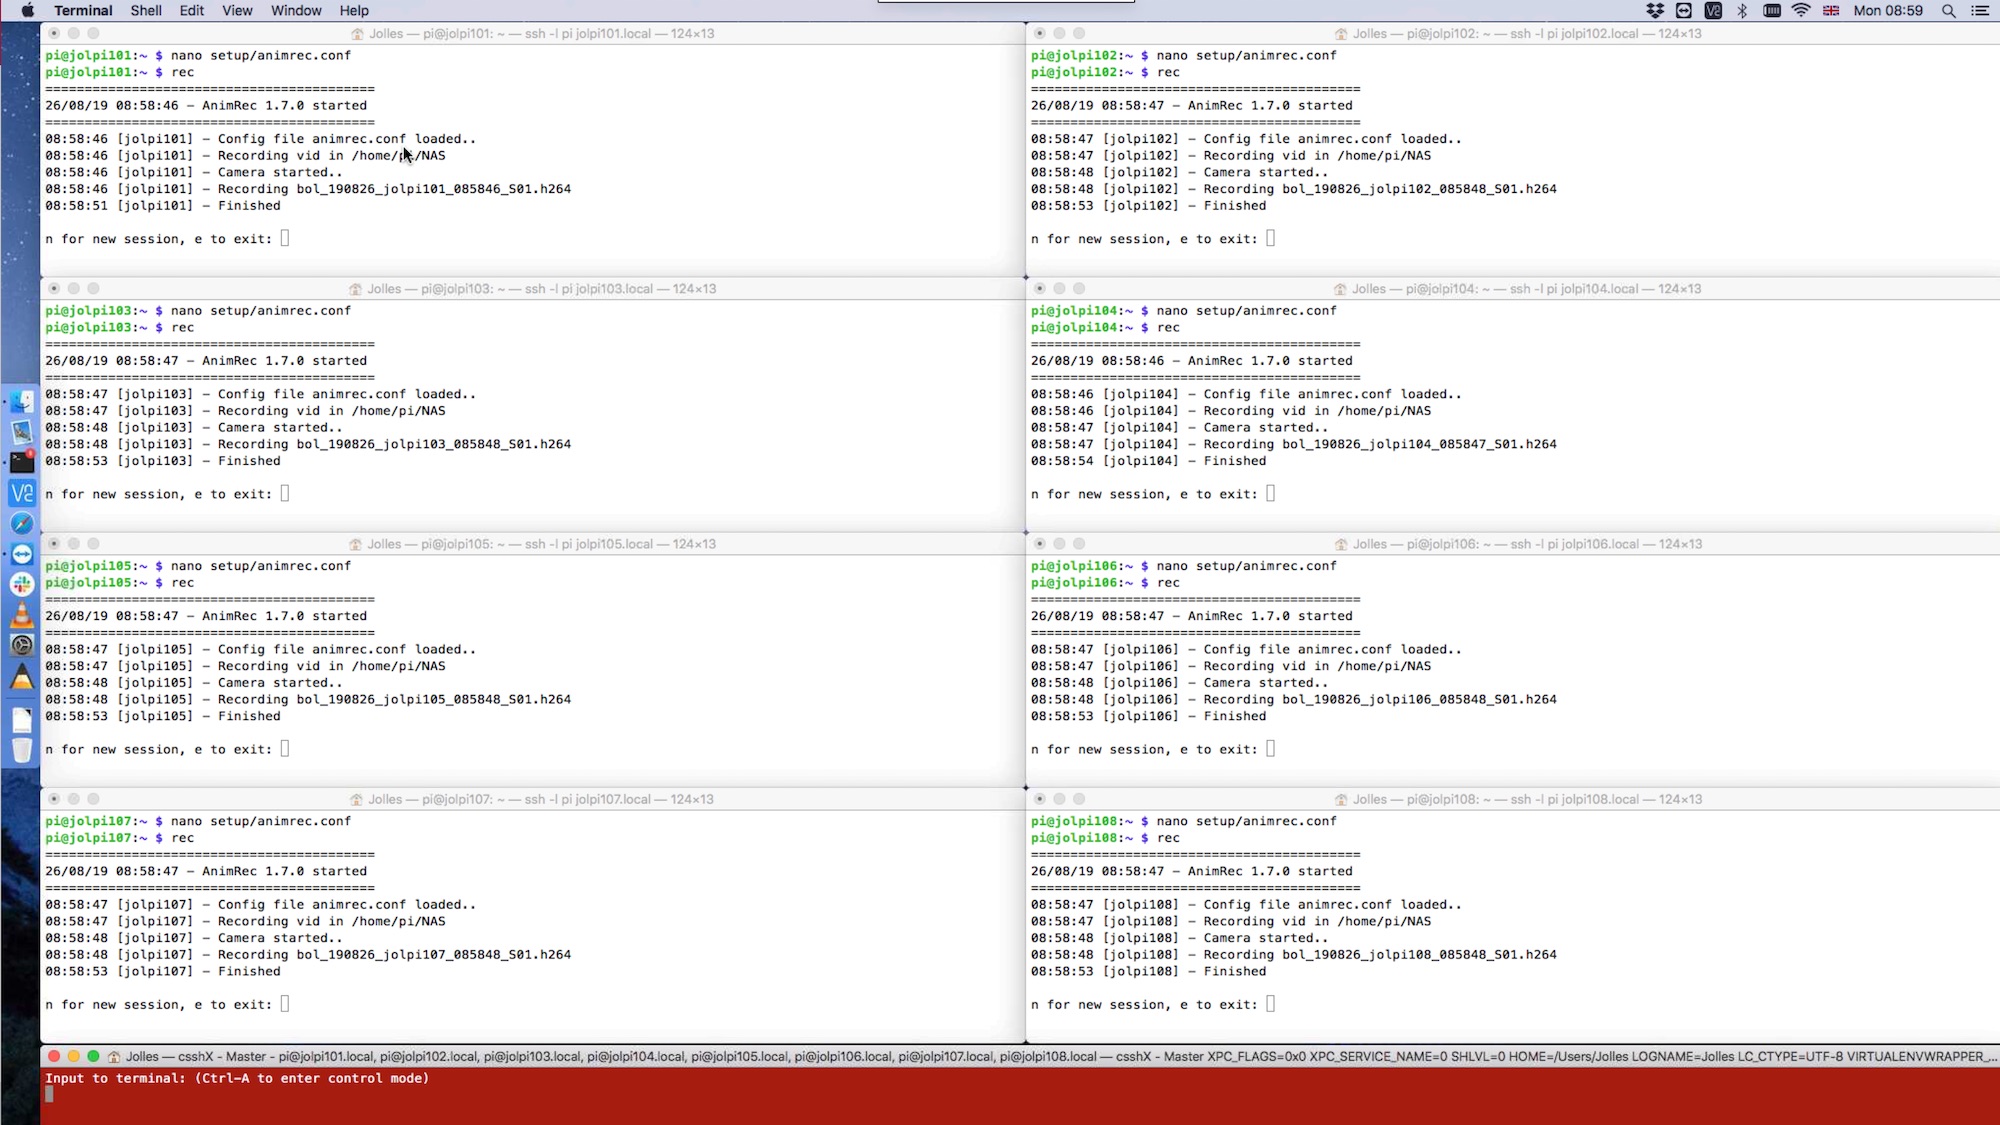
For a new system it is very handy to further update, configure, and work with all your units at once. One way to do this is without is to use a cluster SSH tool, such as csshX. After connecting to your array of devices, a range of windows will open up with a central command window that sends the command to each separate Raspberry Pi. Simple adjustments can be made for each Raspberry Pi by clicking on the respective windows.
Now you are done! A great next step is to read how to configure your system and how to share resources across the network to make full use of your new LAN.