Control electronics using a relay switch
A relay module makes it possible to use the Raspberry Pi to control the power provided to other electronics, which can be extremely useful for a large variety of projects. Here I outline the basics to get started.
Table of contents
WARNING
Be extremely careful when working with relays and connected electronics, especially when wanting to control devices connected to AC mains as a shock can kill you! Hence, this article is for informational purposes only and not written as a step-by-step guide.
What is a relay?
A relay is an electromagnetic switch that can turn on and off DC as well as AC devices. The electromagnet gets power from the Raspberry Pi to either activate or deactivate a (potentially) high-voltage circuit. The relay switch thus acts to either disrupt or not an electronic circuit provided to another device, such as to a light. As there is no direct electrical connection between the Raspberry Pi and the relay circuit that is being switched, it enables the control of high power devices.
Types of relays
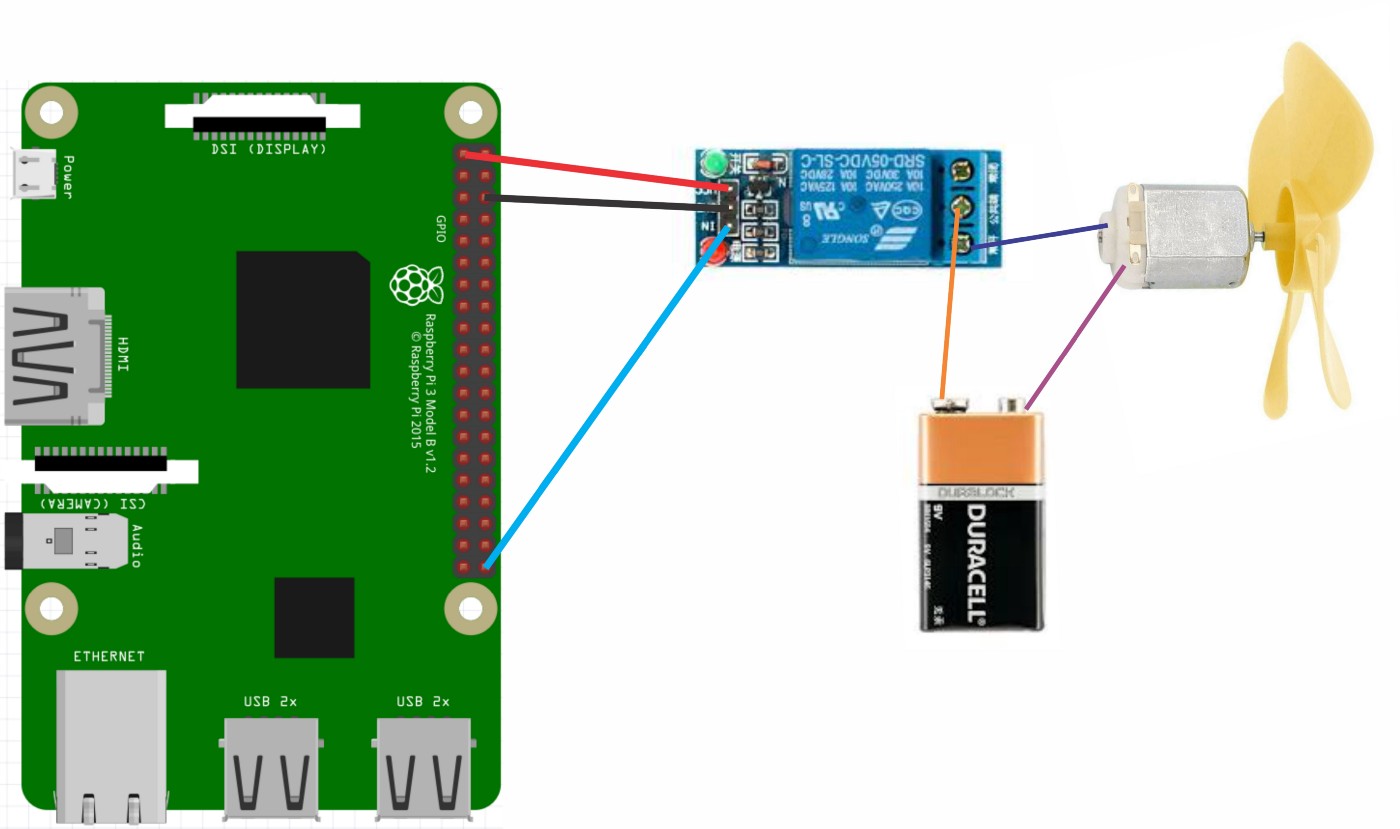
A relay with all necessary electronics to drive it and control the power load is called a relay module. A relay module will need to be connected to a lower power source, such as a Raspberry Pi, to provide current to the electromagnet. One can wire a relay module, such as SRD-05VDC-SL-C, directly to the GPIO pins. However, also a number of Raspberry Pi relay HATs exist that you simply connect to the top of your Raspberry Pi, which provides a fast and stable connection.
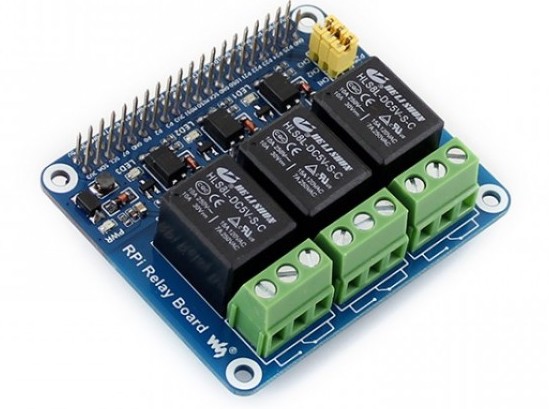
A popular relay HAT is the one from Waveshare (available for ~€20), which comes with three relays that can provide 10A at 230V each.
How to use a relay
A relay has three screw terminals (the green part in the image above): one NO (Normally Open) contact, one NC (Normally Closed) contact, and one COM (Common) contact. The relay can be triggered programmatically to switch between the NO and NC circuits. The NO circuit will by default be turned off and when triggered will be turned on, while the NC circuit works the opposite and is off by default and turns off when triggered. The Common contact is the switching point of the circuit.
To use a relay module, one will have to create an electronic circuit that can be disrupted by the relay. Any DC or AC device contains at least two wires to create the circuit. One of the two wires needs to be cut and
When you want to control the power to a device using a relay module, you will have to disrupt its electronic circuit. Any DC or AC device contains two wires that create a circuit (and potentially a third ground wire). To connect your device you will have to intersect one of the wires and connect the two open ends to the relay switch. One wire should be connected to the COM terminal and the other to either the NO or the NC switch.
For example, when we for example want to control a light, we want the lamp to be turned off until we switch it on with our Raspberry Pi. We thus need to connect the second part of the wire to the NO terminal in this case.
How to control a relay
Whatever relay module you use, either one connected via the GPIO ports directly or a relay HAT, you will be able to control the state of the relay by changing the power provided to the GPIO pins. The easiest way to do this is using Python and the GPIO library.
Using python we first need to set up the connection to the appropriate GPIO pin and then we can change its state with a single command. The Waveshare HAT relays connect to GPIO pins 26, 20, and 21. So for example to change power provided to the first relay with a 1 second delay.:
import time
import RPi.GPIO as GPIO

relay_ch = 26

GPIO.setwarnings(False)
GPIO.setmode(GPIO.BCM)

GPIO.setup(relay_ch, GPIO.OUT)
GPIO.output(relay_ch, GPIO.LOW)
time.sleep(1)
GPIO.output(relay_ch, GPIO.HIGH)
GPIO.cleanup()
Such code can be integrated in much more complicated scripts that incorporate user input or sensor readings, enabling the closed-loop control of high-powered devices.